from flask import Flask, render_template, g, request
import sqlite3

app = Flask(__name__)

@app.route('/')
def main():
return render_template('base.html')Introduction
In this blog, we show how to create a web application using the flask framework. The app enables the user to enter a message and the name of the author of the message. The app stores the messages in a database and the user can see previously submitted messages on the “view messages” subroute. The entire code is hosted in the following GitHub repository:
https://github.com/Aram-1999/PIC16B_HW3.
In order to build a Flask web application we will follow these steps:
1. Install Falsk: This can be done by running the following command on the command line “pip install Flask”.
2. Define routes: In Flask, you define routes to handle different URL paths. For example, you might define a route for the homepage (“/”) and a route for submitting a message (“/submit”).
3. Then we define functions that handle requests and responses. These functions usually return templates.
4. Finally define templates: Flask uses Jinja templates to render HTML. We will create templates for each route we define.
5. Create a database: we will create a database to store the messages and the name of the creator.
Main block of code
In Flask, the main block of code is typically contained in a file called “app.py”. This is where you define the Flask application and set up the routes, views, and templates for your web application. So let’s go ahead and create a “app.py” file. Inside this file we import some useful libraries from flask. “Flask” is a useful class that is used to create routes.
@app.route(‘/’) is a Python decorator used in Flask to define a route for a web application. The main() function returns a template which we will see on http://localhost:5000/.
Similarly, we define the folowing functions:
@app.route("/submit/", methods=['POST', 'GET'])
def submit():
    #return render_template('submit.html')
    if request.method == 'GET':
        return render_template('submit.html',message="")
    else:
        insert_message(request)
        return render_template('submit.html',
        message="Thank you for creating a message")

@app.route('/view')
def view():
    messages = random_messages(8)
    return render_template('view.html', messages=messages)
The submit() function has two methods - POST and GET. These are HTTP methods for communicating between a client and a server. The POST method is used to submit data to the server, while the GET method which is the default for @app.route() is used to request a resource from a server. The submit() function handles GET and POST methods differently. The POST method calls a function which we will discuss below. Also notice that we pass a value “messages” to the template which is how we show the data in the database via Jinja templates.
We also defined a few other useful functions in the “app.py”.
def get_message_db():
    """
    This function checks whether message_db database exists or not.
    If it exists, it returns the database, otherwise it creates a
    database with a table of 2 text columns and an integer column,
    and returns the connection to it.
    """
    g.message_db = sqlite3.connect("message_db.sqlite")
    cur = g.message_db.cursor()

    cur.execute("""
    CREATE TABLE IF NOT EXISTS messages (
        id integer,
        handle text,
        message text)
    """)
    return g.message_db
This function checks whether the message_db database exists or not. If it exists, it returns the database, otherwise it creates a database with a table of 2 text columns and an integer column, and returns the connection to it. Notice also the use of “g” object. This is a global object that is used to store data during a request context. This enables to share data between functions without passing the value explicitly.
def insert_message(request):
    message = request.form["message"]
    name = request.form["name"]

    get_message_db()
    db = g.message_db
    cur = db.cursor()

    cur.execute("SELECT COUNT(id) as count FROM messages")
    id = int(cur.fetchall()[0][0]) + 1

    cur.execute("""
    INSERT INTO messages (id, handle, message)
    VALUES (?, ?, ?);
    """,(str(id), name, message))

    db.commit()
    db.close()
Once we have a POST method in ‘/submit’ subroutine, we call this function to extract the message and the name from the form and store it in the database we created by using the above function.
def random_messages(n):
    db = get_message_db()
    cur = db.cursor()

    cur.execute("SELECT * FROM messages ORDER BY RANDOM() LIMIT ?;",str(n))

    records = cur.fetchall()
    db.close()
    return records
This function returns random messages from the database. The function enables the user to choose the number of messages they want to see.
Jinja Templates
Next we create three templates that are going to be rendered based on the sub-path the user visits to.
<!doctype html>
<link rel="stylesheet" href="{{ url_for('static', filename='style.css') }}">
<title>{% block title %}{% endblock %} - PIC16B Aram Torosyan Website</title>
<nav>
    <h1>A Simple Message Bank</h1>
    <ul class="menu">
        <li><a href="{{ url_for('submit') }}">Submit a message</a></li>
        <li><a href="{{ url_for('view') }}">View messages</a></li>
    </ul>
</nav>
<section class="content">
    <header>
        {% block header %}{% endblock %}
    </header>
    {% block content %}{% endblock %}
</section>
This is the base skeleton of the webpage. The user sees this when they visit the main webpage. It contains blocks that have unique names. Their content will be changed in the children templates. Notice also the url_for() function which creates a full url for submit or view sub-path as the domain route changes depending on the deployment environment of the app.
{% extends 'base.html' %}

{% block header %}
    <h1>Submit a message </h1>
{% endblock %}

{% block content %}
{% if message=="" %}
<p>Once you submit a message, it will redirect you to the messages
    webpage where you can see all the submitted messages.
</p>
    <form method="post" enctype="multipart/form-data">
        <label for="name">Name or Nickname:</label><br>
        <input type="text" id="name" name="name"><br>
        <label for="message">Message:</label><br>
        <input type="text" id="message" name="message"><br><br>
        <input type="submit" value="Submit">
    </form>
{% else %}
<p>{{message}}</p>
{% endif %}
{% endblock %}
This is a child template of “base.html”. This allows you to reuse common HTML or other code across multiple pages in your web application. The block tags defined in the parent template are now filled with some code. The <form> tag is used to create a submit form and collect the messages and names of the user.
{% extends 'base.html' %}

{% block header %}
    <h1> Some messages </h1>
{% endblock %}

{% block content %}
<ul>
    {% for message in messages%}
    <li><span id="message">{{message[2]}}</span><br>
        <span id="name">-{{message[1]}}</span>
    </li> <br>
    {% endfor %}
</ul>
{% endblock %}
This is again a child template of “base.html”. This template displays the messages using a for loop.
Styling
In order to make the website more appealing, we use CSS styling techniques.
html {
    font-family: "Times New Roman";
    background: rgb(214, 209, 201);
    padding: 1rem;
}

body {
    max-width: 900px;
    margin: 0 auto;
}

h1 {
    color: rgb(0, 0, 0);
    font-family: "Times New Roman";
    margin: 1rem 0;
    text-align: center;
}

a {
    color: rgb(11, 34, 78);
    text-decoration: underline;
    font-size: 18px;
}

nav {
    background: rgb(206, 148, 76);
    padding: 0 0.5rem;
    border-radius: 25px;
    text-align: center;
}
This is a small part of the CSS file we used to style the website. The entire file can be accessed in the above-mentioned GitHub repository inside the static folder. This CSS file changes among other things the font type, font size, color of the text and background. The name of the tags indicate what parts of HTML the style inside the curly parenthesis is applied to. The naming of the dictionary style key words is self explanatory. For example, “background” specifies the background color that is applied to all the tags that wrap around the style.
Implementation
In this part, we will submit a few messages and check the view messages sub-path to see if the messages were successfully submitted. Let’s make our first message - “Never forget that your actions have the power to impact others in ways that you may never know. Your kindness, compassion, and generosity can make a profound difference in the world around you.” by Aram. 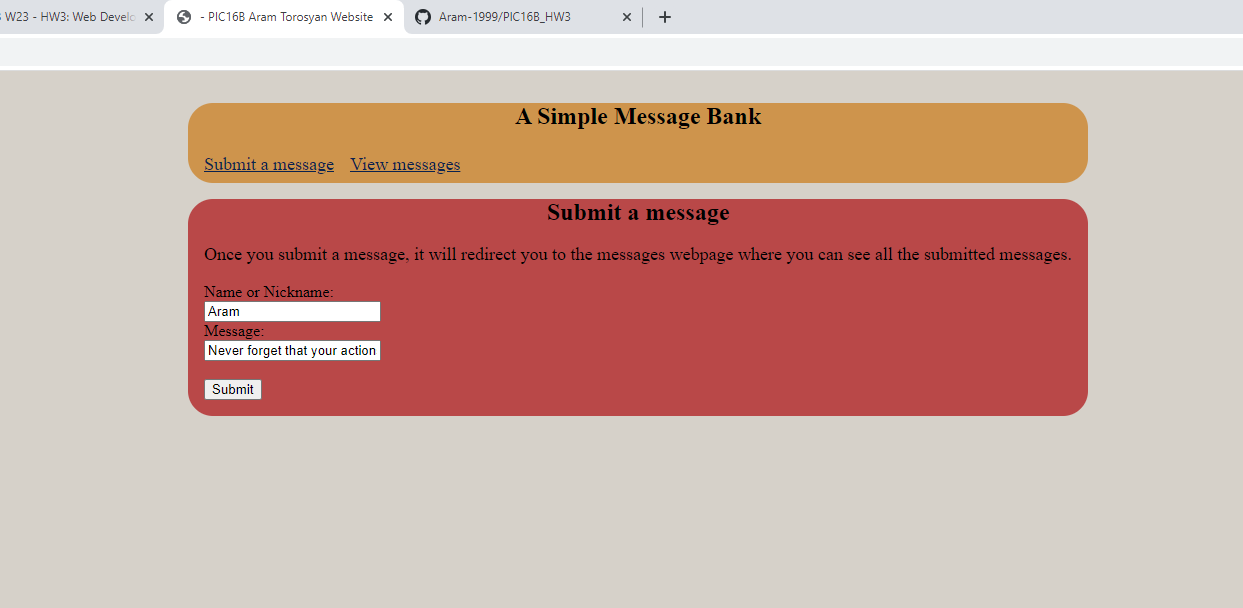
After the message is submitted, the user gets a thank you note.
.png)
After submitting a few messages, we can now visit the “view messages” and see a few of the previously submitted messages.
.png)
This is all about this app. Good luck with making some cool web applications!